Create An HTML Form: Step-by-Step Guide For Beginners

HTML Form Design

When students try to “Create an HTML Form”, they often get stuck making it look clean and professional. While creating input fields is straightforward, arranging them properly and making the form visually appealing is where most beginners face difficulty.

From my experience, this usually happens because students focus only on writing HTML and ignore how the layout works. As a result, their forms work, but they don’t look good or feel easy to use.

In this article, you will learn how to create an HTML form design, so your forms not only collect data properly but also look clean, structured, and professional.

TL;DR: Create An HTML Form

Aspect

Summary

Purpose of HTML Forms

HTML forms are used to collect user input like name, email, and feedback. They send this data to the server for processing.

Basic Structure

A form includes a container, input fields, and a submit button. This structure helps collect and send user data properly.

Key Elements & Inputs

Elements like input, textarea, select, and button help gather different types of data. Attributes control how each field behaves.

Design & Styling

HTML creates the structure, while CSS improves the look and layout. Good design makes forms easier to use and more professional.

Real-World Usage

Forms are used in login, signup, payments, and contact pages. They are essential for making websites interactive and functional.

What Is An HTML Form?

An HTML form is a part of a web page used to collect information from users. Whenever you enter your name, email, or password on a website, you are interacting with a form.

In simple terms, a form acts like a bridge between the user and the server. It gathers the data you type and sends it to the server for processing.

Think of an HTML form as a container that collects user information. It has the following 3 main parts.

  • The form container is the outer structure that holds everything together.
  • The Input fields are the areas where users type or select their information.
  • The Submit button sends the collected data to the server.

Once the user clicks the submit button, the form data is sent and processed, and the website responds accordingly. This is how websites handle actions like signing up, logging in, placing orders, or submitting feedback.

What Is The Basic Structure Of An HTML Form?

When you build an HTML form, you are basically setting up a structure that can collect and send user data. From my experience, every form, whether simple or complex, follows a clear and predictable layout.

Usually, I first share this layout with my mentees so that creating an HTML form from scratch becomes very easy.

1) The <form> tag in HTML:

An HTML form is created by using the ‘form’ tag. It is represented by: <form> and contains different attributes.

All the lines of code written within the form tag represent the form elements. It needs both the opening and closing tags. Therefore, we can write it in the following way:

				
					<form>
// body containing form elements 
</form>


The elements of an HTML form include a checkbox, a text box, submit buttons, radio buttons, drop-down menus, and more. All these elements help in seamless interaction, accurate data input, and storage.

2) The <input> element in HTML:

The main purpose of an HTML form is to collect user input. But how is it done? For this, we have a form element named the <input> element.

The input element is the most basic element that helps us to get the form data. With the help of its various attributes, we can collect different information. Some of the attributes related to <input> are:

  1. Type attribute

  2. Name attribute

A simple example representing the <input> element is given below.

				
					<!DOCTYPE html>
<html lang="en">
<head>
  <title>HTML Form</title>
<style id="wpr-lazyload-bg-container"></style><style id="wpr-lazyload-bg-exclusion"></style>
<noscript>
<style id="wpr-lazyload-bg-nostyle">.rll-youtube-player .play{--wpr-bg-bb1646f6-f5f7-4bdf-9139-ff8af7302619: url('https://codingzap.com/wp-content/plugins/wp-rocket/assets/img/youtube.png');}.rll-youtube-player .play{--wpr-bg-5c838cb7-4378-4d77-9d41-f3bdedea4ab6: url('https://codingzap.com/wp-content/plugins/wp-rocket/assets/img/youtube.png');}</style>
</noscript>
<script type="application/javascript">const rocket_pairs = [{"selector":".rll-youtube-player .play","style":".rll-youtube-player .play{--wpr-bg-bb1646f6-f5f7-4bdf-9139-ff8af7302619: url('https:\/\/codingzap.com\/wp-content\/plugins\/wp-rocket\/assets\/img\/youtube.png');}","hash":"bb1646f6-f5f7-4bdf-9139-ff8af7302619","url":"https:\/\/codingzap.com\/wp-content\/plugins\/wp-rocket\/assets\/img\/youtube.png"},{"selector":".rll-youtube-player .play","style":".rll-youtube-player .play{--wpr-bg-5c838cb7-4378-4d77-9d41-f3bdedea4ab6: url('https:\/\/codingzap.com\/wp-content\/plugins\/wp-rocket\/assets\/img\/youtube.png');}","hash":"5c838cb7-4378-4d77-9d41-f3bdedea4ab6","url":"https:\/\/codingzap.com\/wp-content\/plugins\/wp-rocket\/assets\/img\/youtube.png"}]; const rocket_excluded_pairs = [];</script></head>

<body>
  <h1>
    Login Form 
  </h1>	
  <form>
    Username<br>
    <input type = "text" name = "username"><br>
    Password<br>
    <input type = "text" name = "password">
  </form>
<script>(()=>{class RocketElementorPreload{constructor(){this.deviceMode=document.createElement("span"),this.deviceMode.id="elementor-device-mode-wpr",this.deviceMode.setAttribute("class","elementor-screen-only"),document.body.appendChild(this.deviceMode)}t(){let t=getComputedStyle(this.deviceMode,":after").content.replace(/"/g,"");this.animationSettingKeys=this.i(t),document.querySelectorAll(".elementor-invisible[data-settings]").forEach(t=>{const e=t.getBoundingClientRect();if(e.bottom>=0&&e.top<=window.innerHeight)try{this.o(t)}catch(t){}})}o(t){const e=JSON.parse(t.dataset.settings),i=e.m||e.animation_delay||0,n=e[this.animationSettingKeys.find(t=>e[t])];if("none"===n)return void t.classList.remove("elementor-invisible");t.classList.remove(n),this.currentAnimation&&t.classList.remove(this.currentAnimation),this.currentAnimation=n;let o=setTimeout(()=>{t.classList.remove("elementor-invisible"),t.classList.add("animated",n),this.l(t,e)},i);window.addEventListener("rocket-startLoading",function(){clearTimeout(o)})}i(t="mobile"){const e=[""];switch(t){case"mobile":e.unshift("_mobile");case"tablet":e.unshift("_tablet");case"desktop":e.unshift("_desktop")}const i=[];return["animation","_animation"].forEach(t=>{e.forEach(e=>{i.push(t+e)})}),i}l(t,e){this.i().forEach(t=>delete e[t]),t.dataset.settings=JSON.stringify(e)}static run(){const t=new RocketElementorPreload;requestAnimationFrame(t.t.bind(t))}}document.addEventListener("DOMContentLoaded",RocketElementorPreload.run)})();</script></body>
</html>


We can see that the <input> element created a rectangular box for us to specify the user input. Notice the type attribute and the name attribute here. The output of the web form created with this code is given in the image below.

Output:

Visual representation showing a Login Form where the Type attribute and Name attribute have been used in HTML

While building and testing your form, you may want to check values or see what users enter. Using the Console in JavaScript is a simple way to do quick checks as you develop your form logic.

What Are Some Essential Elements And Their Attributes In HTML Web Forms?

I often tell my students that to build a working form, you need to understand the key elements and how they behave. Each element in a form serves a specific purpose, and its attributes control how it works.

Once you get comfortable with these, creating forms becomes much more efficient and error-free. Now, let us get to know about the commonly used elements and their attributes below.

1) The <form> element:

This is used as a container for all the input elements in an HTML form. It consists of the following attributes:

  • Action Attribute: An HTML form’s action attribute specifies the URL for processing input data submitted by the user.

  • Method Attribute: It specifies the HTTP method to process form data. For example: the GET or POST method.

  • Enctype Attribute: It specifies the type of data encryption.

Modifying this in the code example gives us the following HTML form structure.

				
					<form action = "/submit" method = "post">
    Username<br>
    <input type = "text" name = "username"><br>
    Password<br>
    <input type = "text" name = "password">
   </form>


2) The <input> element:

The input element is responsible for creating interactive controls for user input. It has some common control types and attributes. Let us see both of these below.

Attributes of <input>:

  • Type Attribute: The type attribute in HTML specifies the input type for the form data.

  • Name Attribute: This attribute specifies the name of the input, and it is used to identify form data when it is submitted.

  • Value Attribute: It specifies the initial value of the input.

  • Placeholder Attribute: It specifies the text displayed in place of the input when it is empty.

Common types for <input>

  • The text type is used for single-line text input.
  • The password type is used for password entry and hides the characters typed by the user.
  • The email type validates that the entered value follows a proper email format.
  • The number type allows users to enter numeric values.
  • The radio type lets users select one option from multiple choices.
  • The checkbox type allows users to select one or more options.
  • The submit type creates a button that submits the form data.

Now, let us see how and where we can include these attributes and control types in our HTML code and see how our web form looks.

				
					<form action = "/submit" method = "post">
    Username<br>
    <input type="text" name="username" placeholder="Enter your username" required><br>
    Password<br>
    <input type="password" name="password" placeholder="Enter your password" required><br>
    Email ID<br>
    <input type="email" name="email" placeholder="Enter your email" required><br>
   </form>


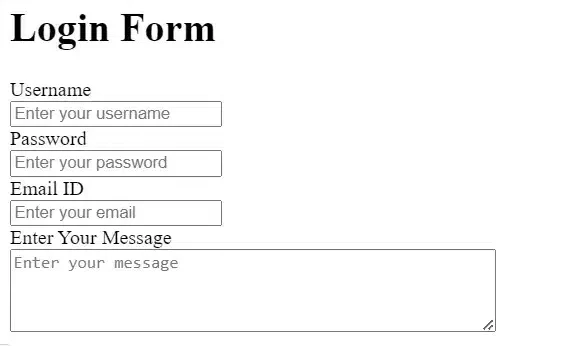
After including the necessary type attributes, we will see the changes given below in our form. A new input field for email ID has been added to our HTML login form. We can also see the placeholder text in place for the input.

Output:

In this image, the output of a login form has been shown where 3 fields are present like Username, Password and Email ID

3) The <textarea> element:

We know that the type ‘text’ is used for single-line text input. But what if we have to take multi-line input from the user? For this, we have the <textarea> tag. Let us see some of its attributes as well.

  • Name Attribute: It specifies the name of the text area.

  • Rows: It specifies the number of visible lines for the input text.

  • Cols: It specifies the visible width for the text area.

Now, let us also add this element tag to our HTML form code. Have a look at the example code.

				
					<!DOCTYPE html>
<html lang="en">
<head>
  <title>HTML Form</title>
<style id="wpr-lazyload-bg-container"></style><style id="wpr-lazyload-bg-exclusion"></style>
<noscript>
<style id="wpr-lazyload-bg-nostyle">.rll-youtube-player .play{--wpr-bg-bb1646f6-f5f7-4bdf-9139-ff8af7302619: url('https://codingzap.com/wp-content/plugins/wp-rocket/assets/img/youtube.png');}.rll-youtube-player .play{--wpr-bg-5c838cb7-4378-4d77-9d41-f3bdedea4ab6: url('https://codingzap.com/wp-content/plugins/wp-rocket/assets/img/youtube.png');}</style>
</noscript>
<script type="application/javascript">const rocket_pairs = [{"selector":".rll-youtube-player .play","style":".rll-youtube-player .play{--wpr-bg-bb1646f6-f5f7-4bdf-9139-ff8af7302619: url('https:\/\/codingzap.com\/wp-content\/plugins\/wp-rocket\/assets\/img\/youtube.png');}","hash":"bb1646f6-f5f7-4bdf-9139-ff8af7302619","url":"https:\/\/codingzap.com\/wp-content\/plugins\/wp-rocket\/assets\/img\/youtube.png"},{"selector":".rll-youtube-player .play","style":".rll-youtube-player .play{--wpr-bg-5c838cb7-4378-4d77-9d41-f3bdedea4ab6: url('https:\/\/codingzap.com\/wp-content\/plugins\/wp-rocket\/assets\/img\/youtube.png');}","hash":"5c838cb7-4378-4d77-9d41-f3bdedea4ab6","url":"https:\/\/codingzap.com\/wp-content\/plugins\/wp-rocket\/assets\/img\/youtube.png"}]; const rocket_excluded_pairs = [];</script></head>

<body>
  <h1>
    Login Form 
  </h1>	
  <form action = "/submit" method = "post">
    Username<br>
		<input type="text" name="username" placeholder="Enter your username" required><br>
    Password<br>
		<input type="password" name="password" placeholder="Enter your password" required><br>
  	Email ID<br>
		<input type="email" name="email" placeholder="Enter your email" required><br>
    Enter Your Message<br>
        <textarea name="message" rows="4" cols="50" placeholder="Enter your message"></textarea>

   </form>
</body>
</html>


Let us now have a look at the resulting HTML form after adding the text area form element as the input field to it. Now, you can type in a multi-line input type as form data. The image below represents our output HTML form.

Output:

The previous output image has been modified and we are getting a new output image where there is a section to write message using the textarea element

4) The <select> and <option> elements:

The select and option tags are used to create a drop-down menu and define the options in the list, respectively. Now, let us have a look at some of the attributes for the same.

  • Name Attribute: For the name of the select element.

  • Multiple: It is used in case you need to select more than one element.

Let us modify this form element in our HTML code and see how our form looks. The code is given below.

				
					<!DOCTYPE html>
<html lang="en">
<head>
  <title>HTML Form</title>
<style id="wpr-lazyload-bg-container"></style><style id="wpr-lazyload-bg-exclusion"></style>
<noscript>
<style id="wpr-lazyload-bg-nostyle">.rll-youtube-player .play{--wpr-bg-bb1646f6-f5f7-4bdf-9139-ff8af7302619: url('https://codingzap.com/wp-content/plugins/wp-rocket/assets/img/youtube.png');}.rll-youtube-player .play{--wpr-bg-5c838cb7-4378-4d77-9d41-f3bdedea4ab6: url('https://codingzap.com/wp-content/plugins/wp-rocket/assets/img/youtube.png');}</style>
</noscript>
<script type="application/javascript">const rocket_pairs = [{"selector":".rll-youtube-player .play","style":".rll-youtube-player .play{--wpr-bg-bb1646f6-f5f7-4bdf-9139-ff8af7302619: url('https:\/\/codingzap.com\/wp-content\/plugins\/wp-rocket\/assets\/img\/youtube.png');}","hash":"bb1646f6-f5f7-4bdf-9139-ff8af7302619","url":"https:\/\/codingzap.com\/wp-content\/plugins\/wp-rocket\/assets\/img\/youtube.png"},{"selector":".rll-youtube-player .play","style":".rll-youtube-player .play{--wpr-bg-5c838cb7-4378-4d77-9d41-f3bdedea4ab6: url('https:\/\/codingzap.com\/wp-content\/plugins\/wp-rocket\/assets\/img\/youtube.png');}","hash":"5c838cb7-4378-4d77-9d41-f3bdedea4ab6","url":"https:\/\/codingzap.com\/wp-content\/plugins\/wp-rocket\/assets\/img\/youtube.png"}]; const rocket_excluded_pairs = [];</script></head>

<body>
  <h1>
    Login Form 
  </h1>	
  <form action = "/submit" method = "post">
    Username<br>
		<input type="text" name="username" placeholder="Enter your username" required><br>
    Password<br>
		<input type="password" name="password" placeholder="Enter your password" required><br>
  	Email ID<br>
		<input type="email" name="email" placeholder="Enter your email" required><br>
   Choose The Service You Want To Avail<br>
      <select name="services">
  		<option value="option1">HTML assignment</option>
  		<option value="option2">CSS assignment</option>
  		<option value="option3">JavaScript assignment</option>
	  </select><br>
   Enter Your Message<br>
        <textarea name="message" rows="4" cols="50" placeholder="Enter your message"></textarea>
   </form>
</body>
</html> 


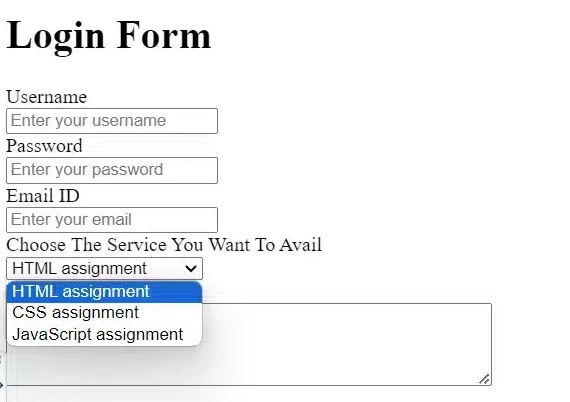
Now that we have added our list of options to our form, the user can select these options, and the selected one becomes our input. The following image shows how the HTML form looks.

Output:

The output image shows a HTML Form where we have included a Select and Option Elements which gives us a dropdown menu

5) The <label> element:

The form label element or tag is used to provide a label for the input element. This enhances accessibility. It is just like a caption that you can use for a particular element. The code snippet shows how we can use it in forms.

				
					<label for="username">Username:</label>
	<input type="text" id="username" name="username" placeholder="Enter your username" required><br>


6) The <button> element:

The <button> element represents a clickable button. In our case, it can be the submit button, the reset button, the cancel button, or any other. For example, in a payment form, you can have the pay button and the exit transaction button.

So, let us add the submit button to our form. The syntax to make a submit button is given below.

				
					<button type="submit">Submit</button>


After including this in our code, we will be able to see a simple button to submit the user data. When the user clicks on it, all the form information is sent to the server.

Let us see how our HTML form finally looks with the submit button and filled input fields.

Output:

The final output of the HTML Login Form where the button element has introdued to get the Submit option in our form


What Are Some Real-World Applications Of HTML Web Forms?

Students often ask me whether HTML Forms are all about theory. I reply to them that the HTML forms are not just a theory; in reality, you interact with them almost every day while browsing the web.

Over the years, I have seen forms being used in almost every type of website, from small blogs to large platforms. They play a key role in collecting data, handling user actions, and making websites interactive.

Some of the important real-world applications of HTML Web Forms are the following.

  • It is used for signing up for a new account on a website by filling in your basic details like name, email, and password.
  • For logging into a platform securely using a username and password, the forms are highly used.
  • If you want to complete an online purchase by entering shipping details and payment information, you have to use forms.
  • For submitting a contact form to reach out to a business or support team, the web developers use HTML Forms.
  • The use of HTML Forms can also be seen in filling out feedback or survey forms to share opinions or experiences.

When you design an HTML form, you may also include images as icons or buttons to make the layout more engaging. If you want to learn how to work with images inside your HTML pages, check out How to Use the Image Tag in HTML.

Practical Example: HTML Form For Payment Card Checkout

Many students often come to me and request to clarify the structure of HTML Forms with a real-world example. In such cases, I connect them with a real-world situation that they see almost every day.

A payment checkout form is a great example because it combines multiple input types in one place. It also shows how important proper structure and validation are for user trust and data accuracy.

In a real payment checkout form, each field is designed to collect a specific piece of information. Based on industry practices, here is how these inputs are typically set up.

  • Card Number uses a numeric input field to accept only numbers.
  • Cardholder Name uses a text input field for entering the name on the card.
  • Expiry Date uses a date input field to select the card’s validity.
  • CVV uses a password-type field to keep the security code hidden.
  • Remarks uses a textarea for any additional notes or instructions.

You can use a checkbox to allow optional user input. To complete the interaction, the form also includes two action buttons.

  • The Pay button to submit the payment details.
  • The Cancel button stops the process and exits the form.
				
					<!DOCTYPE html>
<html lang="en">
<head>
      
    <meta name="viewport" content="width=device-width, initial-scale=1.0">
    <title>Payment Checkout Form</title>
  <style></style>
<style id="wpr-lazyload-bg-container"></style><style id="wpr-lazyload-bg-exclusion"></style>
<noscript>
<style id="wpr-lazyload-bg-nostyle">.rll-youtube-player .play{--wpr-bg-bb1646f6-f5f7-4bdf-9139-ff8af7302619: url('https://codingzap.com/wp-content/plugins/wp-rocket/assets/img/youtube.png');}.rll-youtube-player .play{--wpr-bg-5c838cb7-4378-4d77-9d41-f3bdedea4ab6: url('https://codingzap.com/wp-content/plugins/wp-rocket/assets/img/youtube.png');}</style>
</noscript>
<script type="application/javascript">const rocket_pairs = [{"selector":".rll-youtube-player .play","style":".rll-youtube-player .play{--wpr-bg-bb1646f6-f5f7-4bdf-9139-ff8af7302619: url('https:\/\/codingzap.com\/wp-content\/plugins\/wp-rocket\/assets\/img\/youtube.png');}","hash":"bb1646f6-f5f7-4bdf-9139-ff8af7302619","url":"https:\/\/codingzap.com\/wp-content\/plugins\/wp-rocket\/assets\/img\/youtube.png"},{"selector":".rll-youtube-player .play","style":".rll-youtube-player .play{--wpr-bg-5c838cb7-4378-4d77-9d41-f3bdedea4ab6: url('https:\/\/codingzap.com\/wp-content\/plugins\/wp-rocket\/assets\/img\/youtube.png');}","hash":"5c838cb7-4378-4d77-9d41-f3bdedea4ab6","url":"https:\/\/codingzap.com\/wp-content\/plugins\/wp-rocket\/assets\/img\/youtube.png"}]; const rocket_excluded_pairs = [];</script></head>
<body>

<div class="form-container">
    <h2>Checkout Form</h2>
  <b>Your total is = $12</b><br><br>
    <form action="/submit-payment" method="post">
        <div class="form-group">
            <label for="card-number">Card Number:</label>
            <input type="number" id="card-number" name="card-number" required>
        </div>
        <div class="form-group">
            <label for="card-holder-name">Card-holder Name:</label>
            <input type="text" id="card-holder-name" name="card-holder-name" required>
        </div>
        <div class="form-group expiry-group">
            <label for="expiry-month">Expiry Date:</label>
            <select id="expiry-month" name="expiry-month" required>
                <option value="" disabled selected>Month</option>
                <option value="01">01</option>
                <option value="02">02</option>
                <option value="03">03</option>
                <option value="04">04</option>
                <option value="05">05</option>
                <option value="06">06</option>
                <option value="07">07</option>
                <option value="08">08</option>
                <option value="09">09</option>
                <option value="10">10</option>
                <option value="11">11</option>
                <option value="12">12</option>
            </select>
            <select id="expiry-year" name="expiry-year" required>
                <option value="" disabled selected>Year</option>
                <option value="2024">2024</option>
                <option value="2025">2025</option>
                <option value="2026">2026</option>
                <option value="2027">2027</option>
                <option value="2028">2028</option>
            </select>
        </div>
        <div class="form-group">
            <label for="cvv">CVV:</label>
            <input type="password" id="cvv" name="cvv" required>
        </div>
        <div class="form-group">
            <label for="remarks">Remarks:</label>
            <textarea id="remarks" name="remarks" rows="2"></textarea>
        </div>
        <div class="form-group checkbox-group">
          <input type="checkbox" id="additional-input" name="additional-input">
          <label for="additional-input" style = "margin: 0">Save this card for later?</label>  
        </div>
        <div class="form-group button-group">
            <button type="submit">Pay</button>
            <button type="button" onclick="window.location.href='/cancel'">Cancel</button>
        </div>
    </form>
</div>
</body>
</html>


Steps Of The Program:

  • Inside the <body>, a container <div> is used to group and structure the entire checkout form neatly.
  • The <form> element defines where the data will be sent (action) and how it will be sent (method=”post”).
  • Input fields like card number, cardholder name, expiry date, and CVV are used to collect required payment details from the user.
  • Additional elements like <textarea> for remarks and a checkbox allow users to provide optional input.
  • The form ends with two buttons: one to submit the payment and another to cancel and redirect the user.

Output:

The ouptut image showing a real-world example where we are developing a Payment Card Checkout from with different HTML elements


Common Mistakes Students Make In HTML Forms:

When students start working with HTML forms, they usually focus on creating input fields but overlook how forms actually behave. This often leads to small but important mistakes that affect how the form works.

From my experience teaching HTML, most of these issues are not difficult to fix. They happen because students are still getting comfortable with form structure and attributes.

After checking such mistakes in multiple students’ answer sheets, I have drafted the following points.

  • Students often forget to add the name attribute to input fields, which means the data is not sent to the server.
  • Many beginners use the wrong input type, like using text instead of an email or a number, which affects validation.
  • Some students do not use the label tag correctly, making the form less accessible and harder to use.
  • A common mistake is forgetting to add the required attribute where validation is needed.
  • Students sometimes place form elements outside the <form> tag, which prevents the data from being submitted.

To create better HTML forms, it is important to follow a few practical habits. These will help you avoid common errors and make your forms more reliable and user-friendly.

  • Always include the correct name attribute so the form data can be processed properly.
  • Use appropriate input types like email, password, and number for better validation.
  • Connect every input field with a proper label to improve usability and accessibility.
  • Add validation attributes like required, min, and max where needed.
  • Keep your form structure clean and make sure all elements are placed inside the <form> tag.

Conclusion:

Now you have learned how to “Create an HTML Form” from scratch and understand how different input fields work together.

From my experience, the key is not just making the form work, but making sure it feels clear and comfortable for the user. Small improvements in layout and styling can make a big difference in how your form is perceived. 

Forms often need basic validation or dynamic behavior, and that’s where JavaScript comes in. To make your form interactive, you should know How to Add JavaScript in an HTML Document so your scripts can run correctly.


Takeaways:

  • HTML forms are a way to collect a user’s information and process it. This can be a comment, a subscription form, a payment form, etc.
  • Each user input is written in an associated input field that specifies what kind of content it is.
  • We can also include radio buttons, checkboxes, password input, etc., as per the requirements of our form.
  • To make the form more visually appealing and clear, we can add styling using CSS as well.


Frequently Asked Questions:

1) What happens when we click submit in HTML forms?

When you click submit, the form collects all the entered data from the input fields. This data is then sent to the server based on the action and method defined in the form. The server processes the data and sends back a response, like a success or error message.

2) Can HTML forms work without CSS?

Yes, HTML forms can work perfectly without CSS because CSS is only used for styling. Even without design, the form will still collect and send data properly. However, CSS helps make the form more user-friendly and visually appealing.

3) Which input type is most used in HTML forms?

The most commonly used input type is text because it is flexible for many kinds of data. It is used for fields like names, usernames, and general information. Almost every form includes at least one text input field.